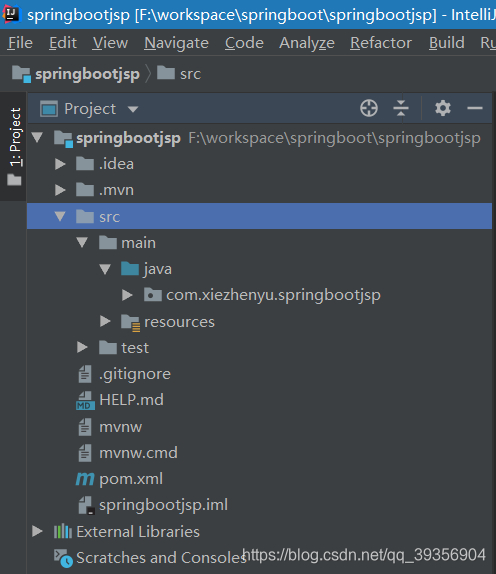
1、Spring Boot 整合JSP技术
在Spring Boot中不推荐使用JSP,但是支持使用。
1.1、创建项目

1.2、修改POM文件,添加JSP引擎与JSTL标签库
JSP引擎:JSP是在tomcat中编译运行的,处理这个环节的就是JSP引擎。在SpringBoot内嵌的tomcat中并没有JSP引擎,所以要添加JSP引擎的依赖。
1
2
3
4
5
6
7
8
9
10
11
12
13
14
15
16
17
18
19
20
21
22
23
24
25
26
27
28
29
30
31
32
33
34
35
36
37
38
39
40
41
42
43
44
45
46
47
48
49
50
51
52
53
54
55
56
57
58
59
60
| <?xml version="1.0" encoding="UTF-8"?>
<project xmlns="http://maven.apache.org/POM/4.0.0" xmlns:xsi="http://www.w3.org/2001/XMLSchema-instance"
xsi:schemaLocation="http://maven.apache.org/POM/4.0.0 https://maven.apache.org/xsd/maven-4.0.0.xsd">
<modelVersion>4.0.0</modelVersion>
<parent>
<groupId>org.springframework.boot</groupId>
<artifactId>spring-boot-starter-parent</artifactId>
<version>2.2.6.RELEASE</version>
<relativePath/>
</parent>
<groupId>com.xiezhenyu</groupId>
<artifactId>springbootjsp</artifactId>
<version>0.0.1-SNAPSHOT</version>
<name>springbootjsp</name>
<description>Demo project for Spring Boot</description>
<properties>
<java.version>1.8</java.version>
</properties>
<dependencies>
<dependency>
<groupId>org.springframework.boot</groupId>
<artifactId>spring-boot-starter-web</artifactId>
</dependency>
<dependency>
<groupId>org.apache.tomcat.embed</groupId>
<artifactId>tomcat-embed-jasper</artifactId>
</dependency>
<dependency>
<groupId>javax.servlet</groupId>
<artifactId>jstl</artifactId>
</dependency>
<dependency>
<groupId>org.springframework.boot</groupId>
<artifactId>spring-boot-starter-test</artifactId>
<scope>test</scope>
<exclusions>
<exclusion>
<groupId>org.junit.vintage</groupId>
<artifactId>junit-vintage-engine</artifactId>
</exclusion>
</exclusions>
</dependency>
</dependencies>
<build>
<plugins>
<plugin>
<groupId>org.springframework.boot</groupId>
<artifactId>spring-boot-maven-plugin</artifactId>
</plugin>
</plugins>
</build>
</project>
|
1.3、创建webapp目录

1.4、标记为web目录

经过这个操作后就可以把webapp标记为web目录,可以方便的在这个目录中创建jsp等文件。
1.5、创建JSP
 注意:webapp/WEB-INF是安全的,不能直接访问,必须通过Controller做跳转。
1.6、修改配置文件,配置视图解析器
1
2
| spring.mvc.view.prefix=/WEB-INF/jsp/
spring.mvc.view.suffix=.jsp
|
1.7、创建Controller
1
2
3
4
5
6
7
8
9
10
11
12
13
14
15
16
17
| package com.xiezhenyu.springbootjsp.controller;
import org.springframework.stereotype.Controller;
import org.springframework.web.bind.annotation.GetMapping;
import org.springframework.web.bind.annotation.PathVariable;
@Controller
public class PageController {
@GetMapping("/{page}")
public String showPage(@PathVariable String page){
return page;
}
}
|
如果在IDEA中项目结构为聚合工程,那么在运行jsp时,需要指定路径。如果项目结构为独立项目,则不需要。

1.8、运行

2、Spring Boot 整合 Freemarker
2.1、创建项目

2.2、修改POM文件,添加Freemarker启动器
1
2
3
4
5
6
7
8
9
10
11
12
13
14
15
16
17
18
19
20
21
22
23
24
25
26
27
28
29
30
31
32
33
34
35
36
37
38
39
40
41
42
43
44
45
46
47
48
49
50
51
52
53
| <?xml version="1.0" encoding="UTF-8"?>
<project xmlns="http://maven.apache.org/POM/4.0.0" xmlns:xsi="http://www.w3.org/2001/XMLSchema-instance"
xsi:schemaLocation="http://maven.apache.org/POM/4.0.0 https://maven.apache.org/xsd/maven-4.0.0.xsd">
<modelVersion>4.0.0</modelVersion>
<parent>
<groupId>org.springframework.boot</groupId>
<artifactId>spring-boot-starter-parent</artifactId>
<version>2.2.6.RELEASE</version>
<relativePath/>
</parent>
<groupId>com.xiezhenyu</groupId>
<artifactId>springbootfreemarker</artifactId>
<version>0.0.1-SNAPSHOT</version>
<name>springbootfreemarker</name>
<description>Demo project for Spring Boot</description>
<properties>
<java.version>1.8</java.version>
</properties>
<dependencies>
<dependency>
<groupId>org.springframework.boot</groupId>
<artifactId>spring-boot-starter-web</artifactId>
</dependency>
<dependency>
<groupId>org.springframework.boot</groupId>
<artifactId>spring-boot-starter-freemarker</artifactId>
</dependency>
<dependency>
<groupId>org.springframework.boot</groupId>
<artifactId>spring-boot-starter-test</artifactId>
<scope>test</scope>
<exclusions>
<exclusion>
<groupId>org.junit.vintage</groupId>
<artifactId>junit-vintage-engine</artifactId>
</exclusion>
</exclusions>
</dependency>
</dependencies>
<build>
<plugins>
<plugin>
<groupId>org.springframework.boot</groupId>
<artifactId>spring-boot-maven-plugin</artifactId>
</plugin>
</plugins>
</build>
</project>
|
2.3、创建Users实体
1
2
3
4
5
6
7
8
9
10
11
12
13
14
15
16
17
18
19
20
21
22
23
24
25
26
27
28
29
30
31
| package com.xiezhenyu.springbootfreemarker.pojo;
public class Users {
private String username;
private String usersex;
private String userage;
public String getUsername() {
return username;
}
public void setUsername(String username) {
this.username = username;
}
public String getUsersex() {
return usersex;
}
public void setUsersex(String usersex) {
this.usersex = usersex;
}
public String getUserage() {
return userage;
}
public void setUserage(String userage) {
this.userage = userage;
}
public Users(String username, String usersex, String userage) {
this.username = username;
this.usersex = usersex;
this.userage = userage;
}
public Users() {
}
}
|
2.4、创建Controller
1
2
3
4
5
6
7
8
9
10
11
12
13
14
15
16
17
18
|
@Controller
public class UsersController {
@GetMapping("/showUsers")
public String showUsers(Model model) {
List<Users> list = new ArrayList<>();
list.add(new Users("admin","F","32"));
list.add(new Users("zhangshang","M","23"));
list.add(new Users("lisi","M","18"));
model.addAttribute("list",list);
return "usersList";
}
}
|
2.5、创建视图
1
2
3
4
5
6
7
8
9
10
11
12
13
14
15
16
17
18
19
20
21
22
23
| <!DOCTYPE html>
<html lang="en">
<head>
<meta charset="UTF-8">
<title>Title</title>
</head>
<body>
<table border="1" align="center" width="50%">
<tr>
<th>Name</th>
<th>Sex</th>
<th>Age</th>
</tr>
<#list list as user>
<tr>
<td>${user.username}</td>
<td>${user.usersex}</td>
<td>${user.userage}</td>
</tr>
</#list>
</table>
</body>
</html>
|
2.6、修改配置文件
在application.properties中配置freemarker的拓展名
1
| spring.freemarker.suffix=.ftl
|
2.7、运行结果


 注意:webapp/WEB-INF是安全的,不能直接访问,必须通过Controller做跳转。


